|
Spars re-assembled prior to riveting.
|

|
I used pleanty of clecos to hold thing together. I din't want anything shifting with all the pounding that was about to occur.
|

|
The end currently being riveted rests directly on the bucking bar.
|

|
Sonex sells a special bucking bar that already has the required shape to fit in tight against the spar caps. It is cheap ($15) and works fine. It would be even better if it was welded to a large plate of thick steel. That would make it heavier and more stable to prevent shifting and bouncing while riveting. In my case I used a 1" thick plank of wood clamped tightly against my bench top.
|

|
The other end of the spar is blocked up to match the height of th bucking bar.
|

|
Sonex recommends not dimpling the thin top web in advance, but rather using the rivet itself to create the dimple. This works very well. A flush rivet is inserted in the hole, the bucking bar is positioned as close as possible to the hole, and the rivet is whacked with the big bolt and hammer. One or two whacks makes a nice dimple.
|

|
Here I am setting the first rivet. I was a little nervous, seeing as how this was something completely new. As it turned out, I used the wrong rivet (should have listened to that little voice). I also got to experience drilling out a rivet for the first time...
|

|
The big bolt method is slow (really slow at first), but little by little, the rivets were getting done. My work rate is dreadfully slow right now. I am lucky to get 20 rivets per hour. I think the dome head rivets will go faster.
|

|
One negative thing I have noticed is that the bold head tends to mar the primer wherever it rubs. This leaves lots of ugly looking black marks on the web. Laquer thinner didn't really do much to it, so unfortunately I have to live with it at this point. I added another coat of primer to the spar when it was completely riveted.
|

|
After completing the first spar, I was unhappy with how difficult it was to get consistent and uniform rivets. My work rate on the first spar was about 60 rivets per hour. This was HARD work! I finally decided that my technique and workbench were the problem. I figured that the spar was rebounding too much and that was causing the problems.
|

|
For the second spar I transferred the bucking bar and wood blocks directly to the garage floor. This provided a very stable work platform. If I'd have only known how much easier it was on the floor, I would have gone there immediately! Sonex told us at the workshop to rivet over a table leg, or something stable, but I guess my bench just wasn't stiff enough.
|

|
The rivets went in so much easier this time! Quality was way up, and my work rate jumped to at least double. Additionally, setting a rivet only took 304 whacks instead of 4-6. This meant less fatigue. Lastly, it is important to hit the bolt as close to vertical as possible. If the bolt is canted over to one side, or the face of the hammer is slanted, the rivet will not set perfectly.
|

|
It was actually easier to hit the rivets with the spar on the floor. Plus, I could sit on the floor and whack away! This was great!
|

|
To better set the dome-head rivets, I taped a shim onto the bucking bar. This helped align the bar by preventing the spar from canting over to one side. With about 0.065" worth of scrap, the dome-head rivets went in great.
|

|
Everyone (including the factory) says that the spars will bow out after you rivet them. Mine proved to be no exception. I thought that maybe if I set rivets with the heads alternating on the forward side and rear side that I could reduce this bowing. This was not the case. The first spar was riveted all from one side, and on the workbench. The second spar had alternating rivets (actually about every third bay had the rivet direction reversed), and actually turned out slightly MORE bowed....not much more, but certainly no less. My conclusion: don't worry about the bowing and rivet away.
|

|
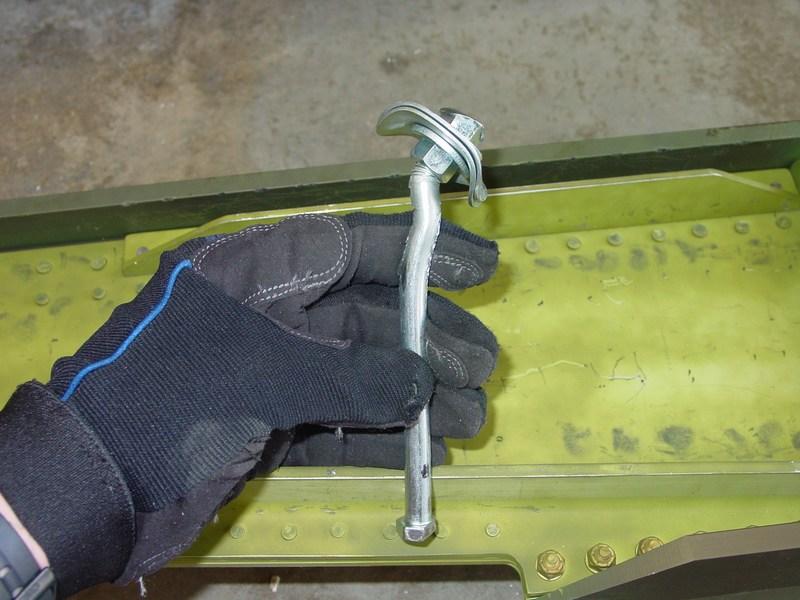
There is a large stiffener angle near the root end of the spar. Space is very tight in here, and my big bolt wouldn't fit. I purchased a smaller (3/8") diameter bolt, washer, and nuts to make up a second rivet setter. I had to do some grinding on one side of the bolt face to make it fit.
|

|
This bolt did a great job on the rivets, but took noticeably more effort to do so (due to its less mass I think). The tight quarters of the angles ensured the bolt came straight down, and made real nice shop heads on the rivets.
|

|
Unfortunately, the bolt just wasn't up to the abuse of all the pounding. After the first stiffener was done, the bolt was deformed, but usable.
|

|
Usable, yes. Good, no! Once the bolt had yielded it did so freely. I had to straighten the bolt after every three rivets or so, and each time it got a little worse. In hindsight, I should have bought TWO bolts...they were only $1.62 in materials!
|

|
The small bolt did a fine job on the rivets, but it did ding up the spar caps wherever they touched. To prevent stress risers I smoothed out any dings and later primed any exposed metal.
|

|
Finally, the spars are all riveted! This feels like a huge milestone. This is the one part of the project I would dread doing over. Well, maybe they're not quite that bad, but I am still thrilled to me finished!
|